Cara Menghentikan, membasmi, dan menghapus Banjir Virus Folder Shortcut (Yuyun PIF Starter) « Bos Gentong Ideal's Blog: "Beberapa hari yang lalu, teman saya ada yang mengeluhkan komputernya terkena virus yang tidak mempan diperbaiki menggunakan anti virus apapun. Lalu aku search2 di internet tentang virus yang menjangkiti nie… so aku kan mensharing dikit ilmuku cara mengatasi virus yang berbentuk shortcut ini.
virus tersebut membuat shortcut dari folder yang ada di hardisk. Namun
shortcut tersebut jika dilihat property-nya akan mengarah pada link virus yang bersarang di windows/system32.
Virus PIF/Starter/Yuyun atau yang lebih dikenal dengan virus shortcut yang termasuk dalam golongan virus vbs membuat kesal korbannya dengan banyak sekali shortcut yang dibuat oleh virus tersebut. Repotnya, kalau cara penanganan virus ini tak tepat maka ia malah akan kembali lagi, lagi dan lagi.
Adapun Ciri – Ciri Virus Shortcut tersebut adalah:
Pertama-tama, setelah menginfeksi komputer, dia akan membuat file induk
database.mdb di My Documents
Yang kedua adalah virus tersebut akan membuat file autorun.inf yang super terhidden Berukuran 8kb di setiap drive harddisk, flash disk, dan folder tanpa kecuali
Yang ketiga adalah dia akan membuat file Thumb.db Berukuran 8kb (hati-hati, perhatikan bahwa file ini tanpa huruf s sedangkan thumbnail cache yang asli di komputer memiliki tambahan huruf s alias thumbs.db) di setiap folder
Untuk memancing korban, dia akan membuat file Microsoft.lnk dan New
Harry Potter, New Folder, Aplikasi atau and Nama_Folder.lnk di setiap folder yang jika dieksekusi akan langsung mengaktifkan
viruss Seperti halnya viruss-virusmembuat duplikat setiap folder namun kali ini bukan dengan ekstensi .exe melainkan extensi .lnk alias shortcut.
Pada task manager terdapat proses services wscript.exe yang sedang
berjalan. Dalam kondisi normal, tidak ada proses seperti ini.
Sebenarnya cara kerja sederhana virus ini sudah saya berikan pada pennjelasan pembuatan virus sederhana dari notepad (Silahkan kalau mau
menganalisa klik disini)
Oleh sebab itu, simak 7 cara jitu dari analis virus Vaksincom MG Lat untuk menghentikan banjir shortcut yang diakibatkan virus ini::
1. Sebelumnya matikan dulu proses system restore. (klik kanan my
computer>properties>System restore>centang semua system restore on all drivers)
2. Matikan proses dari file Wscript yang terletak di C:\Windows\System32, dengan cara menggunakan tools seperti CProcess, HijackThis atau dapat juga menggunakan Task Manager dari Windows.
3. Setelah dimatikan proses dari Wscript tersebut, kita harus men-delete atau me-rename dari file tersebut agar tidak digunakan untuk sementara oleh virus tersebut.
Sebagai catatan, kalau kita me-rename dari file Wscript.exe tersebut dengan otomatis, maka akan dikopikan lagi di folder tersebut. Oleh sebab itu, kita harus mencari di mana file Wscript.exe yang lainnya, biasanya ada di C:\Windows\$NtServicePackUninstall$, C:\Windows\ServicePackFiles\i386.
Tidak seperti virus-virus VBS lainnya, kita bisa mengganti Open With dari file VBS menjadi Notepad, virus ini berextensi MDB yang berarti adalah file Microsoft Access. Jadi Wscript akan menjalankan file DATABASE.MDB seolah-olah dia adalah file VBS.
Agar kelihatan file yang tersuper hidden gunakan menu Tools>Folder Option>tab View seperti pada gambar
4. Delete file induknya yang ada di C:\Documents and Settings\\My Documents\database.mdb, agar setiap kali komputer dijalankan tidak akan me-load file tersebut. Dan jangan lupa kita buka juga MSCONFIG, disable perintah yang menjalankannya.
5. Sekarang kita akan men-delete file-file Autorun.INF. Microsoft.INF dan Thumb.db. Caranya, klik tombol START, ketik CMD, pindah ke drive yang akan dibersihkan, misalnya drive C:\, maka yang harus kita lakukan adalah:
Ketik cd C:\ untuk menuju direktori local disk C: kemudian ketik del Microsoft.inf /s, perintah ini akan men-delete semua file microsoft.inf di seluruh folder di drive C:. Sementara kalau mau pindah drive tinggal diganti nama drivenya saja contoh: cd d:\ kemudian ketikkan del Microsoft.inf /s.
Untuk file autorun.inf, ketik del autorun.inf /s /ah /f, perintah akan men-delete file autorun.inf (syntax /ah /f) digunakan karena file tersebut memakai attrib RSHA, begitu juga untuk file Thumb.db (del Thumb.db /s
/ah /f) lakukan juga hal yang sama.
Jadi file2 yang perlu didelet dalam langkah ini adalah:
del autorun.inf /s /ah /f
del Thumb.db /s /ah /f
del desktop.ini /s /ah /f
del Microsoft.inf /s
6. Untuk men-delete file-file selain 4 file terdahulu, kita harus mencarinya dengan cara search file dengan ekstensi .lnk (LNK) ukurannya 1 kb. Pada ‘More advanced options’ pastikan option ‘Search system folders’ dan ‘Search hidden files and folders’ keduanya telah dicentang. (Gunakan Shift+del agar file yang terdelete gak masuk recyclebin)
Harap berhati-hati, tidak semua file shortcut / file LNK yang berukuran 1 kb adalah virus, kita dapat membedakannya dari ikon, size dan tipenya. Untuk
shortcut yang diciptakan virus ikonnya selalu menggunakan icon ‘folder’, berukuran 1 kb dan bertipe ‘shortcut’. Sedangkan folder yang benar
harusnya tidak memiliki ‘size’ dan tipenya adalah ‘File Folder’.
7. Fix registry yang sudah diubah oleh virus. Untuk mempercepat proses
perbaikan registry salin script dibawah ini pada program ‘notepad’ kemudian simpan dengan nama ‘Repair Yuyun Shortcut.inf’. Jalankan file tersebut dengan cara:
- Klik kanan repair.inf
- Klik Install
[Version]
Signature=”$Chicago$”
Provider=Vaksincom Oyee
[DefaultInstall]
AddReg=UnhookRegKey
DelReg=del
[UnhookRegKey]
HKLM, Software\CLASSES\batfile\shell\open\command,,,”””%1″” %*”
HKLM, Software\CLASSES\comfile\shell\open\command,,,”””%1″” %*”
HKLM, Software\CLASSES\exefile\shell\open\command,,,”””%1″” %*”
HKLM, Software\CLASSES\piffile\shell\open\command,,,”””%1″” %*”
HKLM, Software\CLASSES\regfile\shell\open\command,,,”regedit.exe “%1″”
HKLM, Software\CLASSES\scrfile\shell\open\command,,,”””%1″” %*”
HKLM, SOFTWARE\Microsoft\Windows NT\CurrentVersion\Winlogon, Shell,0, “Explorer.exe”
HKLM, SYSTEM\ControlSet001\Control\SafeBoot, AlternateShell,0, “cmd.exe”
HKLM, SYSTEM\ControlSet002\Control\SafeBoot, AlternateShell,0, “cmd.exe”
[del]
HKLM,SOFTWARE\Microsoft\Windows\CurrentVersion\Run, Winupdate
HKCU,SOFTWARE\Microsoft\Windows\CurrentVersion\Run, explorer
Atau kalo gak mau repot2 buat Repair Yuyun Shortcut.inf Bisa langsung di download disini
Sekedar Tambahan ajah Karakteristik yuyun yang saya analisa
thumb.db =>pengecek pengaktifan virus
autorun.inf => script startup
xxxxxx.ink =>penyalur ke induk, dan mengesekusinya yang akan menjalankan thumb.db
database.mdb, Microsoft Office Update for Windows XP.sys => File Induknya
xxxxxxx.pif =>pembandrol and pembawanya
v.doc => pesan yang disampaikan si pembawa virus
====UPDATE====
Oh yach perlu diketahui smadav versi yang terbaru sudah dapat mendeteksi virus yuyun lho…
Kalo mau download + fitur Pro smadav Bisa langsung ke TKP
http://hazirah-muslimah.blogspot.com/2010/12/smadav-pro-gratis-masak-sich-y-ya-lah/
Boar lebih ampuh lagi kombinasikan dengan Avira premium securtity suite…. ada sudah saya sertakan keynya di sini
http://hazirah-muslimah.blogspot.com/2010/12/gratis-key-avira-premium-security-suite-3-bulan-dengan-nama-kamu-sendiri/
- Sent using Google Toolbar"
google-site-verification=ConJMH783GAFpknpANwlOsajeF2uHunuHjbBhFZBAcw
Senin, 13 Desember 2010
File conversion for free! Convert any file to anything!
File conversion for free! Convert any file to anything!: "WOW! I just went over to MakeUseOf and man did they find a kickass tool that I wish I had knew about earlier! I’ve had to convert a lot of documents from PDF to JPEG, PDF to Word, Word to JPG and I ended up buying some software for about $50 that did SOME, not all, of these few conversions…
Well, there is a web site called ZamZar and it’s a completely free tool that you can use to convert between just about any possible type you can think of! They have all the document types, image types, music formats, and video formats! This is so much better than those commercial apps that only convert between specific formats and they cost some!
And it’s terribly easy, off the main page, just browse for your file, pick what you want it converted to, enter your email address and click Convert! I tried to convert a PDF to Word and it took about 1 minute to upload the file, receive an email and download the converted file! Now that’s a cool service. So if you or your business needs to convert files, this is the place to go!
- Sent using Google Toolbar"
google-site-verification=ConJMH783GAFpknpANwlOsajeF2uHunuHjbBhFZBAcw
Add Wikipedia, Google to Vista start menu instant search
Looking to customize Vista Instant Search? If you’re using Window Vista, you may be finally using the built-in search option that you see in the Start Menu. For one thing, it actually FINDS what you are looking for and it doesn’t take a century. Also, it’s conveniently located in the Start Menu itself, so you can access it quickly with one click of the mouse or via the Windows keyboard shortcut.
Obviously, by default, the Vista Instant Search feature only searches for files and folders on your local computer. You can also click on Search the Internet, but this option will use the default search engine provider that you have set in Internet Explorer.
However, there is a nifty way to customize the Instant Search feature so that you could, for example, type in a search term in the start menu search box and click on Search Google or Search Wikipedia, or any other site that you use to search like Yahoo, etc.
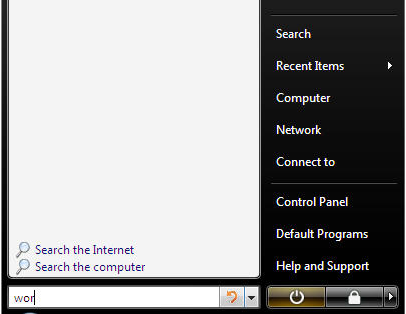

So how can you add our own custom search providers to the default list of search computer and search Internet? With a simple group policy change! Here’s how.
How To Customize The Start Menu In XP
There are several ways we can customize the start menu in XP to work more efficiently. We can customize it to take up less real estate on the screen, Stop annoying popup messages, customize the look and feel, etc. The first thing I would like to look at is stopping XP from highlighting newly installed programs. Every time you install a new program XP is set to highlight it on the Start menu by default.
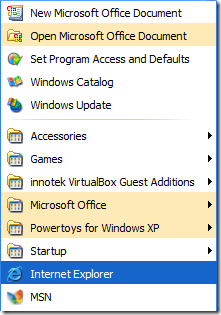 To do this right click on the Start menu and select Properties. This opens up the Taskbar and Start Menu Properties. From here just click on the Customize button.
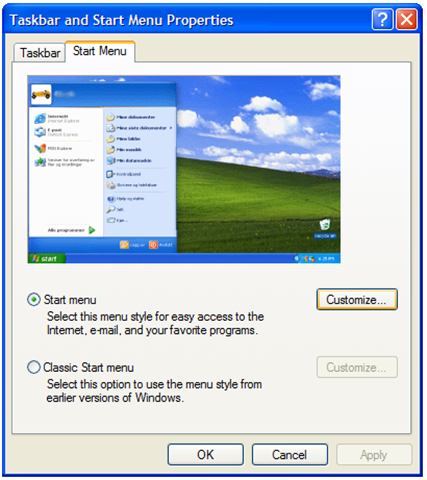 Click on the Advanced tab and uncheck the box next to Highlight newly Installed Programs. Uncheck


Extract text from PDF, DOC, HTML, CHM, and RTF files
Have a document in PDF format that you would like to convert to a text document? Or maybe an HTML or CHM (Windows Help File) that you need to convert into simply plain text? Why might this be useful you ask? Most PDF documents are not editable and selecting the text manually can be a tedious process.
You can use Text-Mining-Tool to automatically extract text from a PDF file so that you can use it in any program freely. Or if you cannot open a PDF file because you do not have a PDF viewer installed, you can use this tool to extract the text and read the document.
Text Mining Tool is completely free and does not even require an installation, simply unzip it and run the program to use it.
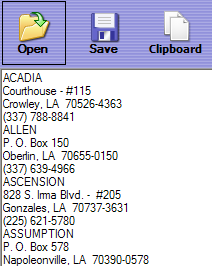

Click the Open button and choose your file that you want to convert to text. Click ok and the large window below the buttons will eventually fill with all of the text extracted from the document.

How to convert a PDF file to Word, Excel or JPG format
One common question I’ve run across a lot these days in the office is how to convert a PDF file to Microsoft Word format (doc), Excel format (xls), or JPG picture format. Usually, people want to know how to convert a file to PDF, but it’s also nice to be able to convert back the other way. Converting to Word is actually pretty simple and can be done directly using an online file conversion service called Zamzar. Going to Excel or JPG is a two step process, but nothing very difficult to follow.
Update: There’s a much easier way to convert a PDF to JPG image format than the method I have mentioned below. Here’s how you can do it using Zamzar.com.
That’s it! By the way, if youare interested in how to extract the text from a PDF document or how to convert Word files to PDF, etc, check out the links.
Update: There’s a much easier way to convert a PDF to JPG image format than the method I have mentioned below. Here’s how you can do it using Zamzar.com.
Convert a PDF file to JPG – Easy Way
Go to ZamZar.com, browse for your file and choose PNG format for the format to conver to under Step 2. PNG is another newer picture format that is slowly replacing the JPG format. Most programs that can open JPG files can open PNG. Zamzar automatically converts each page in the PDF document into it’s own PNG picture file. Now you can simply open Microsoft Paint (yes, all you need it Paint!) and choose File – Save As from the menu and choose JPEG from the drop down list of formats.That’s it! By the way, if youare interested in how to extract the text from a PDF document or how to convert Word files to PDF, etc, check out the links.
How to prevent shutdown of a Windows XP computer
google-site-verification=ConJMH783GAFpknpANwlOsajeF2uHunuHjbBhFZBAcw
If you’re looking for a way to prevent people from shutting down or logging off your Windows XP machine, you’ve come to the right place. Whatever your reason may be, it’s pretty easy to remove all options for shutting down or logging off a computer.
In Windows XP, there are several ways to shut down a computer: click on Start and Shut Down or Turn Off, press CTRL + ALT + DEL and choose Shutdown, open the command prompt and type in the shutdown command, or install a third party application that shuts down your computer for you.
Let’s try to go through each method and see how we can block them. First, you can remove the Shut Down button from the Start Menu and from the CTRL + ALT + DEL screen by using the Group Policy Editor.
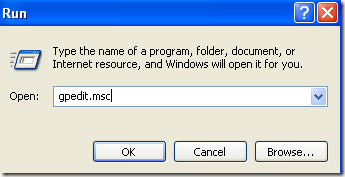
Click on Start and then Run and type in gpedit.msc and press Enter.
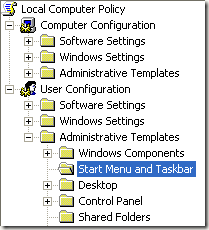
 In the left pane, expand User Configuration and then expand Administrative Templates. Finally, click on
Start Menu and Taskbar.
 Now on the right pane, double-click on Remove and prevent access to Shut Down command and set it to Enabled. You’ll notice in the description that this will remove the shutdown option from the Start Menu and security dialog box. However, the system can still be shutdown via the command prompt also.
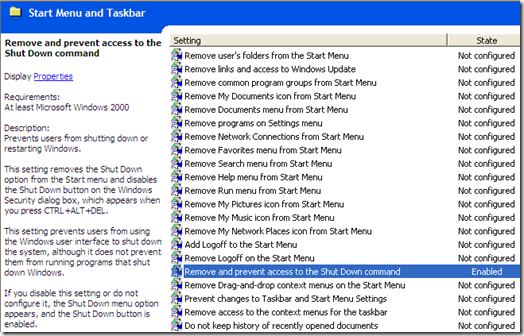 Also, find Remove Logoff on start menu and set it to Enabled also. If a user is able to log off, they can shutdown the computer on the main log into Windows screen. You can also configure Group Policy to only allow shutdown of the computer when someone is logged on.
Go to Computer Configuration – Windows Settings – Security Settings – Local Policies – Security Options and scroll down to Shutdown: Allow the system to be shutdown without having to log on and set it to Disabled.
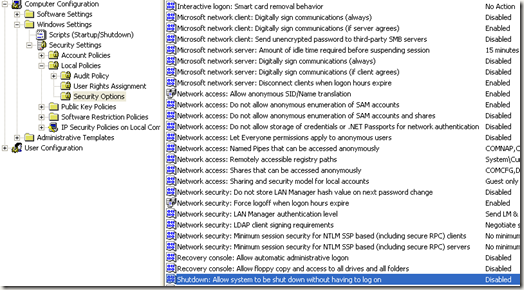 Finally, you need to prevent people from going to the command prompt and simply typing in shutdown! To do this, go to the following policy:
User Configuration – Administrative Templates – System and double-click on the Prevent access to the command prompt policy and set it to Enabled.
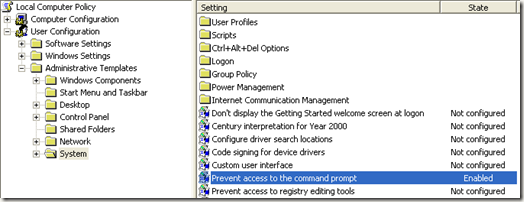 Note that everything in the User Configuration section will apply to all users except the Administrator, so you can restart the computer and log in as Administrator to change back any of these settings if you like.
Also, if you make the account a non-administrative account, then users will not be able to install any software that could be used to shut down the computer. So create a new user account and make sure it is not in the Administrators or Power Users group and the apply these Group Policy settings. This will also ensure that someone cannot use the remote shutdown command in Windows to shut down the computer.
There are lots of other cool things you can do in Group Policy, such as disabling the restart now message after a Windows Automatic Update or adding Google and Wikipedia to the Vista Instant Search menu.
In Windows XP, there are several ways to shut down a computer: click on Start and Shut Down or Turn Off, press CTRL + ALT + DEL and choose Shutdown, open the command prompt and type in the shutdown command, or install a third party application that shuts down your computer for you.
Let’s try to go through each method and see how we can block them. First, you can remove the Shut Down button from the Start Menu and from the CTRL + ALT + DEL screen by using the Group Policy Editor.
Click on Start and then Run and type in gpedit.msc and press Enter.

Start Menu and Taskbar.


Go to Computer Configuration – Windows Settings – Security Settings – Local Policies – Security Options and scroll down to Shutdown: Allow the system to be shutdown without having to log on and set it to Disabled.

User Configuration – Administrative Templates – System and double-click on the Prevent access to the command prompt policy and set it to Enabled.

Also, if you make the account a non-administrative account, then users will not be able to install any software that could be used to shut down the computer. So create a new user account and make sure it is not in the Administrators or Power Users group and the apply these Group Policy settings. This will also ensure that someone cannot use the remote shutdown command in Windows to shut down the computer.
There are lots of other cool things you can do in Group Policy, such as disabling the restart now message after a Windows Automatic Update or adding Google and Wikipedia to the Vista Instant Search menu.
How to add music to PowerPoint
google-site-verification=ConJMH783GAFpknpANwlOsajeF2uHunuHjbBhFZBAcw
One common question I get is how to add music to a PowerPoint presentation? Add a music track to a PowerPoint presentation can really help make the presentation more interesting. It’s especially useful for creating presentations for friends or family.
In this article, I will explain how you can add music to PowerPoint 2007 presentation. The process is fairly straightforward and there are just a couple of options you can configure.
Note that in PowerPoint 2007, you can also record sound for each slide and therefore create a audio and visual presentation if you like where everything is synced nicely.
How to add music to PowerPoint
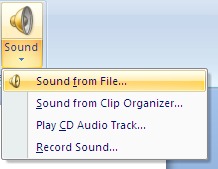
First, click on the Insert tab on the Office Ribbon and then click on the Sound button to the far right.
You’ll now see a few options from the drop down: Sound from file, Sound from Clip Organizer, Play CD Audio track, and Record Sound.
If you already have an audio file that you want to insert into your presentation, then choose Sound from File. PowerPoint 2007 supports number audio file formats including AIF, AU, MID, RMI, MP3, WAV, and WMA.
How to capture, save, record or download streaming audio for free
Ever wonder how you could possibly record or rip a song that’s being streamed across the Internet onto your computer for free? Trying to download streaming audio directly to your computer can be quite difficult because different sites have different security measures put in place, so one program might work for one site, but not another.
However, one surefire way of recording streaming audio from any web site is to simply capture it via the sound card on your computer. Basically, there are programs that can record whatever is being played by your computer’s speakers, so if you can hear it, it can be recorded. Of course, you’ll have to listen to the entire song since the recording is live, but it’s definitely much easier than trying to download the file from the web site directly.
There are two programs that I use to capture and save streaming audio: one installs as a toolbar into Internet Explorer or FireFox and the other one is a standalone program.
If you don’t mind having another toolbar installed in your browser window, FreeCorder is a very convenient program to use if you’re going to be recording music that’s mostly played via the web, such as Internet radio, etc. Also, it has many other features that make it quite useful, such as the ability to extract audio from videos and record from your PC’s microphone or line-in port. It also supports Windows Vista and has absolutely no spyware or adware, so you don’t have to worry about pop-ups, etc. You can save the recordings out as MP3 or as WAV files.
Copy a USB Drive’s Contents to Your Hard Drive Automatically
Almost everyone has a USB storage drive these days. Many of us carry multiple USB drives on our key chains. The convenient portability of these drives makes them a must-have for anyone who uses multiple computers.
USBFlashCopy is a piece of software designed to make using our beloved USB drivers more convenient. Instead of copying files and folders from our USB drives to our hard drives individually, USBFlashCopy automatically copies everything on our USB drives to our hard drive without even a click of the mouse.

USBFlashDrive is a quick, 300 KB download from USBFlashCopy.com.
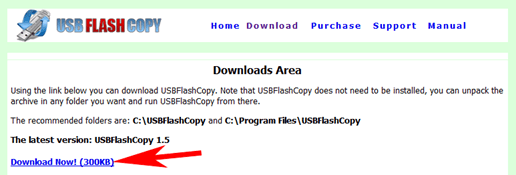
By default, the program does not start when Windows starts. Thus, to make the USB drive downloading truly automatic, we must change this setting. From the start menu, open the program.
At the bottom left of the program’s first window, choose one of the startup options next to Run on Windows startup. The For All Users option is the best selection for truly automatic downloading.

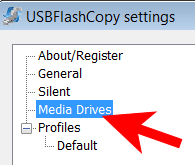
Among the other settings in this control panel is the option to select which drive letters should automatically download. Click Media Drives to open the menu.
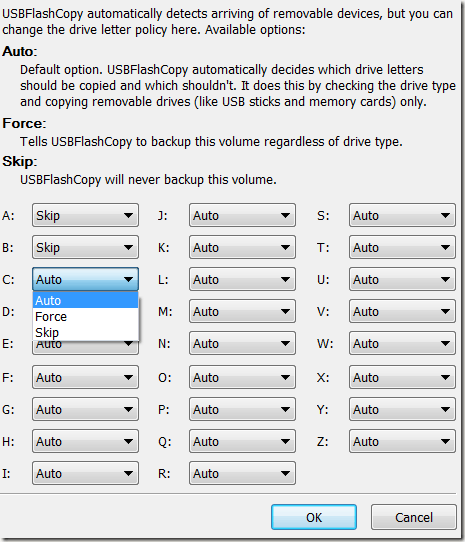
Drive letters from A: to Z: are listed with A: and B: automatically skipped from automatic downloading. Use the drop down menu next to each letter to decide which drive letters should download automatically, and which should skip. Click OK when finished.
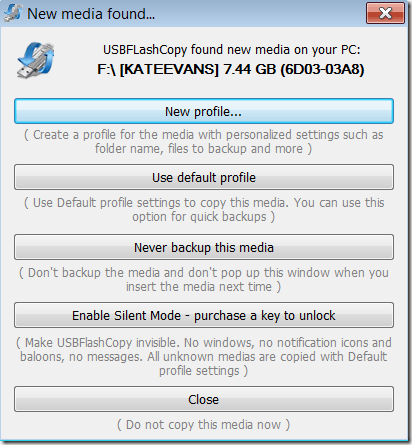
Now you are ready to plug in your USB drive. The first time you plug in a new drive, USBFlashCopy will ask you what to do with this drive. Click Create a New Profile to set options for download the drive’s contents.
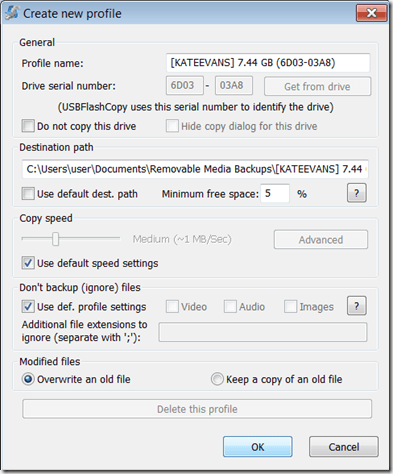
While there are many profile options, the most important on the list is the Destination Path. Choose a place on your hard drive for storing USB drive backups. If all other options look OK, click OK to finish the profile.
A status window will display showing the backup’s progress. From now on, every time you plug in the USB drive, it will automatically download.

USBFlashDrive automates the backup process very well. If the status window is distracting, you may purchase a key for $39.95. This price seems very steep to just remove a status window, but the status window is immovable—making it impossible to see the right hand corner of the screen while downloading occurs.
google-site-verification=ConJMH783GAFpknpANwlOsajeF2uHunuHjbBhFZBAcw
USBFlashCopy is a piece of software designed to make using our beloved USB drivers more convenient. Instead of copying files and folders from our USB drives to our hard drives individually, USBFlashCopy automatically copies everything on our USB drives to our hard drive without even a click of the mouse.
USBFlashDrive is a quick, 300 KB download from USBFlashCopy.com.

By default, the program does not start when Windows starts. Thus, to make the USB drive downloading truly automatic, we must change this setting. From the start menu, open the program.
At the bottom left of the program’s first window, choose one of the startup options next to Run on Windows startup. The For All Users option is the best selection for truly automatic downloading.

Among the other settings in this control panel is the option to select which drive letters should automatically download. Click Media Drives to open the menu.

Drive letters from A: to Z: are listed with A: and B: automatically skipped from automatic downloading. Use the drop down menu next to each letter to decide which drive letters should download automatically, and which should skip. Click OK when finished.

Now you are ready to plug in your USB drive. The first time you plug in a new drive, USBFlashCopy will ask you what to do with this drive. Click Create a New Profile to set options for download the drive’s contents.

While there are many profile options, the most important on the list is the Destination Path. Choose a place on your hard drive for storing USB drive backups. If all other options look OK, click OK to finish the profile.

A status window will display showing the backup’s progress. From now on, every time you plug in the USB drive, it will automatically download.

USBFlashDrive automates the backup process very well. If the status window is distracting, you may purchase a key for $39.95. This price seems very steep to just remove a status window, but the status window is immovable—making it impossible to see the right hand corner of the screen while downloading occurs.
google-site-verification=ConJMH783GAFpknpANwlOsajeF2uHunuHjbBhFZBAcw
How to fix runonce.msn.com runonce2.aspx error in IE7
google-site-verification=ConJMH783GAFpknpANwlOsajeF2uHunuHjbBhFZBAcw
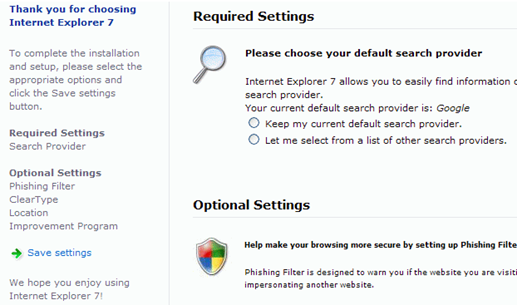
I just ran across another great Microsoft error that should never have occurred because it’s really not a needed feature! New to IE7 is the RunOnce screen that tries to get users to customize their settings, such as which language you want to use and if you want to join the Customer Experience program, etc, before starting to use IE7 for browsing.
If you’re going to add silly stuff like this in IE7 as the FIRST thing everyone in the world sees when they start up their browser, you should at least make sure it WORKS all the time! Sadly, it does not, as I just figured out. Here’s some issues you can end up having with it:
Trojan Dropper W32/Stuxnet

image from www.virenvernichter.de
Hati2 dengan USB Flash Disk yang masuk ke komputer anda
karena Microsoft telah mengumumkan adanya celah yang hingga saat ini belum ada tambalan yang disediakan.
Celah ini memungkinkan Malware/Virus/Trojan dan kawan2 untuk bisa masuk ke sistem komputer.
Dan tanpa sepengetahuan anda melalui Flash Disk.
Penyebab Komputer Crash
Para pemakai komputer mungkin sudah tidak asing lagi dengan komputer
yang crash, dan bagi pemakai OS Windows biasanya akan tampil Blue
Screen of Death (BSOD) bila terjadi crash pada komputer.
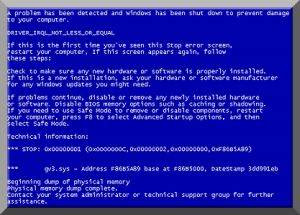
Ternyata banyak faktor yang memungkinkan terjadinya crash pada sistem komputer anda. Berikut beberapa faktor tersebut, yang harus anda perhatikan agar crash tidak terjadi pada komputer anda.

Ternyata banyak faktor yang memungkinkan terjadinya crash pada sistem komputer anda. Berikut beberapa faktor tersebut, yang harus anda perhatikan agar crash tidak terjadi pada komputer anda.
NTLDR Missing
 NTLDR Missing biasanya terjadi dikarenakan file NTLDR dan atau file NTDETECT.COM rusak atau korup dan menyebabkan PC Windows anda menampilkan pesan NTLDR Missing.
Hilangnya file system ini bisa terjadi karena kesalahan saat melakukan shutdown atau shutdown tidak normal(Biasanya gara-gara mati listrik), virus, dan instalasi program tertentu serta beberapa hal lainnya.
Dan untuk memperbaikinya anda harus menggunakan Recovery Console dan booting dengan CD Installer Windows anda. Dalam contoh ini OS yang anda gunakan Windows Xp.
Caranya :
1. Masukan dan boot menggunakan CD Windows XP.
Menghapus Client Service for NetWare dan Mengembalikan Welcome Screen
Dari mulai tadi malam entah kenapa pada saat saya akan mematikan(shutdown) komputer, dialog yang tampil tidak seperti biasanya. Dialog windows yang keluar ternyata menjadi tampilan klasik padahal saya tidak melakukan perubahan setting apa-apa.
Awal mula saya curiga kalau itu semua diakibatkan oleh virus, tapi saya rasa juga tidak mungkin karena saya sendiri tidak sembarangan ketika menjalankan program dan anti virus pun tidak mendeteksi akan adanya virus.
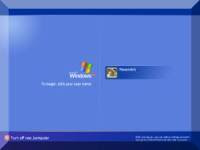
Penasaran dengan hal ini, saya coba restart komputernya dan ternyata tampilan welcome screen windows pun berubah tidak seperti biasanya. Muncul dialog untuk memasukan password padahal saya sendiri tidak menggunakan password. Saya klik OK saja tanpa pikir panjang.
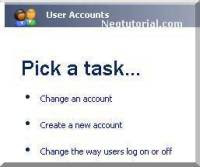
Setelah itu saya coba cari solusinya dengan masuk ke settingan Control Panel >> User Accounts, karena biasanya settingan welcome screen tersebut ada pada menu setting User Accounts. Dan ternyata memang ada disana "Change the way user log on or off", lihat gambar dibawah ini.
Namun setelah saya klik opsi tersebut malah muncul warning "Client Services for Netware has disabled the Welcome screen and Fast User Switching. To restore these features , you must uninstall Client Services for Netware.". Apalagi ini ???

Awal mula saya curiga kalau itu semua diakibatkan oleh virus, tapi saya rasa juga tidak mungkin karena saya sendiri tidak sembarangan ketika menjalankan program dan anti virus pun tidak mendeteksi akan adanya virus.
Penasaran dengan hal ini, saya coba restart komputernya dan ternyata tampilan welcome screen windows pun berubah tidak seperti biasanya. Muncul dialog untuk memasukan password padahal saya sendiri tidak menggunakan password. Saya klik OK saja tanpa pikir panjang.
Setelah itu saya coba cari solusinya dengan masuk ke settingan Control Panel >> User Accounts, karena biasanya settingan welcome screen tersebut ada pada menu setting User Accounts. Dan ternyata memang ada disana "Change the way user log on or off", lihat gambar dibawah ini.

Namun setelah saya klik opsi tersebut malah muncul warning "Client Services for Netware has disabled the Welcome screen and Fast User Switching. To restore these features , you must uninstall Client Services for Netware.". Apalagi ini ???
Mempercepat Proses Install Windows XP
 Bagi anda yang sering melakukan instalasi OS Windows mungkin sering merasa tidak sabar, dikarenakan prosesnya yang bisa memakan waktu kurang lebih 1 jam dari mulai formating hingga penyalinan file dan instalasinya.
Namun sebenarnya instalasi ini bisa kita persingkat menjadi kurang lebih 10 menit saja. Tapi saya tidak merekomendasikan bagi anda yang mempunyai PC yang sudah tua A.K.A Zadul :D. Tapi bila anda bersikeras silahkan anda coba saja.
Berikut caranya:
1. Proses awal lakukan seperti biasanya, anda boot dari CD Drive anda dan lakukan formating seperti biasanya.
Setelah proses format dan penyalinan pada mode DOS selesai maka PC akan restart dan akan melanjutkan proses instalasi dengan mode GUI(Graphical User Interface) atau user friendly. lihat gambar di bawah ini
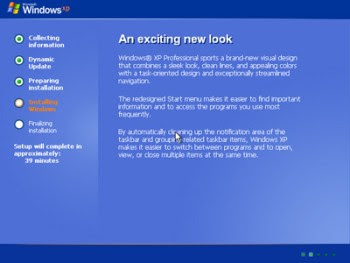
2. Nah pada saat tampilan ini muncul anda tekan SHIFT+F10, yang akan memanggil Command Prompt.
Cara Proteksi Folder Di Windows XP
 Tutorial ini adalah cara lain agar file yang ada di dalam folder kita bisa aman dari jangkauan orang-orang yang jahil atau mungkin dari virus lokal yang menjengkelkan.
Cara ini menurut saya pribadi lebih aman dari pada kita menyembunyikan file dengan memberi attribute Super Hidden.
Karena dengan cara ini kita sendiri tidak bisa mengakses folder tersebut, seperti layaknya anda hendak mengakses folder System Volume Information, kita akan mendapatkan error accessing folder.
Cara Aktivasi Windows XP SP2 dan SP3
Cara aktivasi windows xp SP2 dan SP3 yang terkunci dengan masa trial version selama 30 hari bisa menggunakan cara berikut Pertama kamu download windows xp activatornya di bawah ini
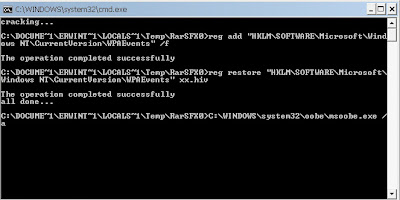
Setelah kamu download jalankan windows xp activatornya lalu tekan enter, maka akan muncul gambar seperti di bawah ini

Selanjutnya Download wpa kill di bawah ini.
Solusi Komputer Tidak Bisa Shutdown
google-site-verification=ConJMH783GAFpknpANwlOsajeF2uHunuHjbBhFZBAcw
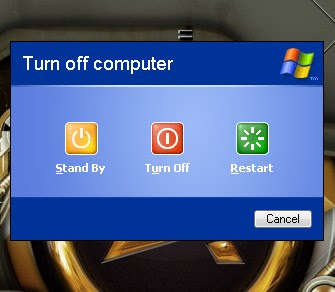 Bagi anda yang mempunyai masalah ketika mematikan komputer dan langsung restart A.K.A tidak mau mati, berikut ada salah satu pengalaman saya yang mungkin bisa bermanfaat bagi anda yang mengalami hal yang serupa.
Komputer yang ketika di shutdown malah menjadi restart sebenarnya bukan restart biasa terutama bagi pengguna OS Windows XP. Masalah ini sebenarnya disebabkan oleh error-nya file system anda atau mungkin lebih dikenal dengan BSOD(Blue Screen Of Death).
Secara default settingan untuk Windows XP ketika Crash/BSOD adalah otomatis restart. Jadi anda mungkin saja tidak melihat atau mengetahui bahwa komputer anda tengah mengalami BSOD ketika anda mencoba mematikan komputer anda.
Untuk dapat mengetahui pesan error BSOD ini anda harus mengatur setting agar ketika terjadi BSOD komputer tidak langsung melakukan restart namun menampilkan pesan BSOD tersebut.
Download Avast! Free Antivirus 5.0.677 - FileHippo.com
Download Avast! Free Antivirus 5.0.677 - FileHippo.com
google-site-verification=ConJMH783GAFpknpANwlOsajeF2uHunuHjbBhFZBAcw
google-site-verification=ConJMH783GAFpknpANwlOsajeF2uHunuHjbBhFZBAcw
How do I add Reactions to my blog?
google-site-verification=ConJMH783GAFpknpANwlOsajeF2uHunuHjbBhFZBAcw
Adding Reactions is done through the settings page of the Blog Post widget. From the Layout | Page Elements tab, simply click the 'Edit' link under the Blog Post widget and a settings window will pop up.

The Configure Blog Post window will display a handful of options, and the Reactions feature is near the bottom of the list:
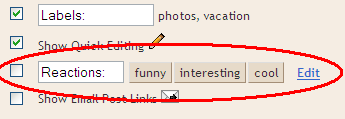
To turn on Reactions just select the checkbox, and then you will be able to customize the feature by adding words of your choosing. Finally, you can choose the exact location of Reactions by dragging the widget at the bottom of the Configure Blog Post page:

Adding Reactions is done through the settings page of the Blog Post widget. From the Layout | Page Elements tab, simply click the 'Edit' link under the Blog Post widget and a settings window will pop up.

The Configure Blog Post window will display a handful of options, and the Reactions feature is near the bottom of the list:

To turn on Reactions just select the checkbox, and then you will be able to customize the feature by adding words of your choosing. Finally, you can choose the exact location of Reactions by dragging the widget at the bottom of the Configure Blog Post page:

How to enable or disable System Restore in Vista
google-site-verification=ConJMH783GAFpknpANwlOsajeF2uHunuHjbBhFZBAcw
System restore is used to restore your system to a previous state. This is a backup of your core Windows system so if you encounter boot-up or hang-up problems, you could restore from a saved system profile.
Click on Start > All Programs > Accessories > System Tools >System Restore. This will open the system restore window.
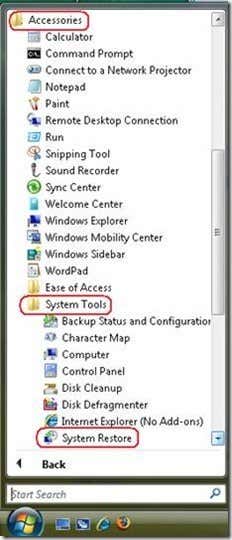
Click open System Protection on the system restore window to open the system properties window.
System restore is used to restore your system to a previous state. This is a backup of your core Windows system so if you encounter boot-up or hang-up problems, you could restore from a saved system profile.
The system restore feature is ideally enabled before you do something crazy to your computer – like installing new hardware that doesn’t have a signed Windows driver or opening a file from an un-trusted source.
To enable or disable system restore in Vista follow the steps below.Click on Start > All Programs > Accessories > System Tools >System Restore. This will open the system restore window.

Click open System Protection on the system restore window to open the system properties window.
How to remove spyware using HijackThis
google-site-verification=ConJMH783GAFpknpANwlOsajeF2uHunuHjbBhFZBAcw
Are you getting unusual system slowdown? Have you tried scanning your computer with an antivirus and cleaned up your hard disk but still no effect? Is your browser too crowded with silly add-ons that your favorite niece mercilessly installed on your home computer?
Stop pulling you hair. Your computer could be infested by malware, adware or just plain annoying but hard to remove software that your antivirus or personal firewall software failed to detect. Nowadays it is easy to be infected with these sort of software because they come in with legitimate software installers like a hardware device driver or a media player.
Canon printers for example come in with a “bonus” software like Easy-WebPrint that supposedly lets you print web pages using your browser. I can do that with just a plain print button on the browser, thank you very much Canon. If you think Canon is bad for trying to give you this stuff, HP is even worse – the HP utility software run even when you are not printing, scanning or browsing anything!
How to backup and restore the Windows Registry
google-site-verification=ConJMH783GAFpknpANwlOsajeF2uHunuHjbBhFZBAcw
Windows stores just about everything it knows about in a file-based database called the Windows Registry. The registry contains all the configuration settings for the operating system and all programs. Everything from the size of the icons to the desktop background is stored there.
Since everything is stored in one place, it’s quite easy to adjust settings or edit configurations, but it’s also equally dangerous because one screw up in the registry and your computer is dead. The best part about it is that one simple change in the registry can lead to the operating system becoming unusable.
That’s why you should always make a backup of the registry before making any changes to it. I’ve written lots of article that require some kind of registry edit and I always mention that a backup should be performed in case something goes wrong.
How to disable settings, services, and programs in Windows XP
google-site-verification=ConJMH783GAFpknpANwlOsajeF2uHunuHjbBhFZBAcw
Even though most people never change the settings on their computers, there are some situations where it’s very useful to be able to turn off or disable a certain program, service, or setting in Windows XP. For example, over the last few years working as an IT Professional, there have been many occasions where it has been proven very useful to disable the firewall in Windows, or to disable the popup blocker in IE, or to disable the autorun/autoplay feature for the CD/DVD drive.
Disabling items such as regedit, task manager, hardware devices, cookies, etc should only be performed if there are other people who use your computer and you want to prevent them from accessing system settings. Disabling items such as System Restore, MSN Messenger, and startup programs can help save computer resources. However, disabling System Restore without knowing what it is used for and not having another backup, would not be a good idea. So only disable items if you are sure you want to disable them!
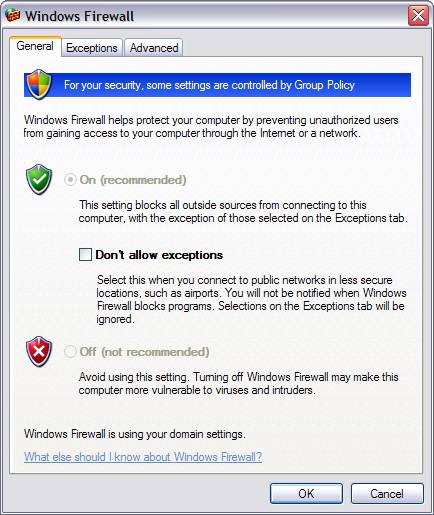 On the General tab, click Off (not recommend) to remove all the blocking restrictions. Only turn off the Firewall if you have another third-party product installed or if you’re checking to see whether a program is being blocked by the firewall or something else.
Even though most people never change the settings on their computers, there are some situations where it’s very useful to be able to turn off or disable a certain program, service, or setting in Windows XP. For example, over the last few years working as an IT Professional, there have been many occasions where it has been proven very useful to disable the firewall in Windows, or to disable the popup blocker in IE, or to disable the autorun/autoplay feature for the CD/DVD drive.
Disabling items such as regedit, task manager, hardware devices, cookies, etc should only be performed if there are other people who use your computer and you want to prevent them from accessing system settings. Disabling items such as System Restore, MSN Messenger, and startup programs can help save computer resources. However, disabling System Restore without knowing what it is used for and not having another backup, would not be a good idea. So only disable items if you are sure you want to disable them!
How to Disable Windows Firewall
You can turn off the Windows Firewall in XP by navigating to the Control Panel (via Start button) and opening the Windows Firewall dialog. If you don’t see the icon, click on Switch to Classic View at the top left.
Fix Registry editing has been disabled by your administrator error
google-site-verification=ConJMH783GAFpknpANwlOsajeF2uHunuHjbBhFZBAcw
If you’ve recently tried to open the Windows Registry and were presented with the message” “Registry editing has been disabled by your administrator”, then you’re not alone! You can get this message for several reasons and sometimes will not be able to run regedit unless you are an Administrator.
Most of the time you will see this in corporate environments where the IT staff has locked down the computer by disbaling Windows settings and services. If it’s a policy pushed out by the main servers, it’ll be pretty hard to bypass, however you can still try!
In order to re-enable access to edit the registry, you can try to edit the group policy settings and see if that works. If you know the local admin password for the computer, log in under that account. If not, you can still give it a shot.
 Step 2: Navigate to User Configuration – Administrative Templates – System
Step 3: In the right hand pane, double click on “Prevent access to registry editing tools”
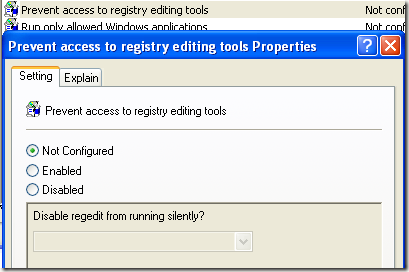 Step 4: If it is not configured, go ahead and enable it, click OK and then come back and disable it. If it’s already set to Enabled, then simply disable it.
Now try to run the registry editor and see if that works. If not, go to the command prompt (Start, Run, type cmd) and type in gpupdate. But if you are in a corporate environment, you may not want to do this as it will update back to the restrictive setting.
In that case, restart the computer, but unplug the network cord so that the computer does not refresh the group policy from the main server. You may also want to do the procedure above while disconnected from the network completely in order to ensure that the policy does not get overridden by the corporate policy.
If you have a home computer, then you don’t have to worry about all of this, just restart your computer and you should be able to edit your registry again.
REG add HKCU\Software\Microsoft\Windows\CurrentVersion\Policies\System /v DisableRegistryTools /t REG_DWORD /d 0 /f
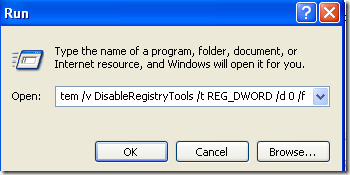 Now try to open the registry editor and see if it works. You may have to restart your computer for the effects to take place.
Note: Before making any changes to the registry, read my article on how to backup and restore the registry in case something goes wrong.
You can download the script here and then just double click on it to run it. After that, try the registry should be enabled.
If none of the above methods work, you may have a virus or some other sort of malware installed on your computer. In some cases, there is a file called regedit.com that gets created and you have to either delete it or rename it to regedit.exe. Read this post on how to remove spyware and malware from your computer. Enjoy!
If you’ve recently tried to open the Windows Registry and were presented with the message” “Registry editing has been disabled by your administrator”, then you’re not alone! You can get this message for several reasons and sometimes will not be able to run regedit unless you are an Administrator.
Most of the time you will see this in corporate environments where the IT staff has locked down the computer by disbaling Windows settings and services. If it’s a policy pushed out by the main servers, it’ll be pretty hard to bypass, however you can still try!
In order to re-enable access to edit the registry, you can try to edit the group policy settings and see if that works. If you know the local admin password for the computer, log in under that account. If not, you can still give it a shot.
Method 1
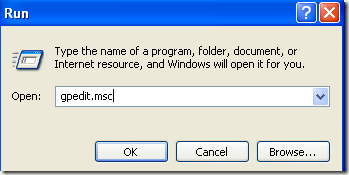
Step 1: Click on Start, choose Run and type in gpedit.msc.
Step 3: In the right hand pane, double click on “Prevent access to registry editing tools”

Now try to run the registry editor and see if that works. If not, go to the command prompt (Start, Run, type cmd) and type in gpupdate. But if you are in a corporate environment, you may not want to do this as it will update back to the restrictive setting.
In that case, restart the computer, but unplug the network cord so that the computer does not refresh the group policy from the main server. You may also want to do the procedure above while disconnected from the network completely in order to ensure that the policy does not get overridden by the corporate policy.
If you have a home computer, then you don’t have to worry about all of this, just restart your computer and you should be able to edit your registry again.
Method 2
Another method you can use is to go to Start, then Run and paste the following line into the run box:REG add HKCU\Software\Microsoft\Windows\CurrentVersion\Policies\System /v DisableRegistryTools /t REG_DWORD /d 0 /f

Note: Before making any changes to the registry, read my article on how to backup and restore the registry in case something goes wrong.
Method 3
If you don’t like to mess with the registry, you can download a VBScript that will enable the registry for you when you run it. The script is a little more advanced and will not harm your computer, it’s actually written by a Microsoft MVP!You can download the script here and then just double click on it to run it. After that, try the registry should be enabled.
If none of the above methods work, you may have a virus or some other sort of malware installed on your computer. In some cases, there is a file called regedit.com that gets created and you have to either delete it or rename it to regedit.exe. Read this post on how to remove spyware and malware from your computer. Enjoy!
Task Manager has been disabled by your administrator -1
google-site-verification=ConJMH783GAFpknpANwlOsajeF2uHunuHjbBhFZBAcw
Sebel rasanya kalau muncul pesan "Task Manager has been disabled by your administrator", padahal kita lagi pengen nampilkan 'task manager' dengan alasan tertentu. Biasanya memang ulah virus yang suka men-disable Task Manager.
Sebel rasanya kalau muncul pesan "Task Manager has been disabled by your administrator", padahal kita lagi pengen nampilkan 'task manager' dengan alasan tertentu. Biasanya memang ulah virus yang suka men-disable Task Manager.
Registry Editing Has Been Disabled By Your Administrator
google-site-verification=ConJMH783GAFpknpANwlOsajeF2uHunuHjbBhFZBAcw
Many times when working on a computer that has been infected with a virus, trojan, or piece of spyware I find myself with my most important command, Regedit, the Windows Registry Editor being disabled. Virus creators like to disable the Registry Editor so it makes solving the problem and removing the issue difficult.
Sometimes administrators in IT departments may place restrictions on using the regedit command to keep employees from changes things on company computers, but viruses and other issues may also try to disable it.
Listed below you will find the different ways to enable regedit, the Registry Editor.

How to Manually Clean the Navidad Trojan
google-site-verification=ConJMH783GAFpknpANwlOsajeF2uHunuHjbBhFZBAcw
What is Navidad Trojan Virus?
This new Internet trojan travels via email. Every response has the subject, "RE:" and the worm as an attachment (NAVIDAD.EXE). This worm also displays a message box upon execution and maps the opening of Windows executables so that it is executed instead of the executable that is called. This causes most Windows programs to not work.
How to Clean/Delete the Navidad Trojan?
The registry needs to edited to delete this Trojan
The easiest solution to cleaning this trojan virus is to download a program to clean up the registry entries and delete the dropped file, WINSVRC.VXD. This download can be found at
Serial Number Windows XP Pro SP1,SP2,SP 3 Genuine Original
google-site-verification=ConJMH783GAFpknpANwlOsajeF2uHunuHjbBhFZBAcw
Sebenarnya postingan tentang serial number XP Genuine sudah saya posting di blog saya dapat duit tanpa modal,berhubung google blogspot yang lagi datang bulan kalau kata para blogger hehehe,jadi ludes semua blogku,dan belum lama ini nambah lagi blogku yang dihapus :(,untungnya seminggu setelah didelete masih bisa dilihat blogku lewat Cachenya,jadi masih sempet tak copas data data yang penting bagi saya sendiri tapi hehehe,termasuk serial XP genuine ini.serial number yang sudah dari dulu saya gunakan setiap menginstal ulang Komputer,meski dengan CD installan yang sudah aspal a.k.a asli tapi plasu,karena gak tahu sudah di burning berapa kali saja instalan XPnya hehehe.SN inilah yang akan saya share pada anda semua yang memerlukan,setelah tadi saya sudah posting tentang Cara download lagu MP3 di 4shared.
Sebenarnya postingan tentang serial number XP Genuine sudah saya posting di blog saya dapat duit tanpa modal,berhubung google blogspot yang lagi datang bulan kalau kata para blogger hehehe,jadi ludes semua blogku,dan belum lama ini nambah lagi blogku yang dihapus :(,untungnya seminggu setelah didelete masih bisa dilihat blogku lewat Cachenya,jadi masih sempet tak copas data data yang penting bagi saya sendiri tapi hehehe,termasuk serial XP genuine ini.serial number yang sudah dari dulu saya gunakan setiap menginstal ulang Komputer,meski dengan CD installan yang sudah aspal a.k.a asli tapi plasu,karena gak tahu sudah di burning berapa kali saja instalan XPnya hehehe.SN inilah yang akan saya share pada anda semua yang memerlukan,setelah tadi saya sudah posting tentang Cara download lagu MP3 di 4shared.
Microsoft Genuine Advantage Diagnostic Tool 1.9 Download
google-site-verification=ConJMH783GAFpknpANwlOsajeF2uHunuHjbBhFZBAcw
Microsoft Genuine Advantage Diagnostic - Seperti yang sudah saya tuliskan pada postingan Windows Media Player 11,12,pengen nginstal Internet Explorer 8 maupun 9,sayangnya XP gak bisa yang di Instal IE 9,cuma bisa buat windows seven saja.Nah ada baiknya bagi yang ingin menginstal dua program tersebut,untuk mengecek terlebih dahulu Operating System yang digunakan,apakah sudah Genuine atau tidak,bagaimana cara ngeceknya,dengan tools apa kita bisa tahu kalau windows kita asli atau tidaknya,website Microsoft sudah memberikan program secara gratis dan portable,jadi tanpa perlu di instal terlebih dahulu,Namanya Microsoft Genuine Advantage Diagnostic Tool.
Microsoft Genuine Advantage Diagnostic - Seperti yang sudah saya tuliskan pada postingan Windows Media Player 11,12,pengen nginstal Internet Explorer 8 maupun 9,sayangnya XP gak bisa yang di Instal IE 9,cuma bisa buat windows seven saja.Nah ada baiknya bagi yang ingin menginstal dua program tersebut,untuk mengecek terlebih dahulu Operating System yang digunakan,apakah sudah Genuine atau tidak,bagaimana cara ngeceknya,dengan tools apa kita bisa tahu kalau windows kita asli atau tidaknya,website Microsoft sudah memberikan program secara gratis dan portable,jadi tanpa perlu di instal terlebih dahulu,Namanya Microsoft Genuine Advantage Diagnostic Tool.
Cara Membuat Win XP SP3,SP2/1 Bajakan/not Genuine Menjadi Asli Original
google-site-verification=ConJMH783GAFpknpANwlOsajeF2uHunuHjbBhFZBAc
Akhirnya postingan Tips Trik yang di tunggu tunggu para pengguna windows bajakan yang tidak genuine XPnya,bisa saya share hari ini(weleh kayak ada yang nunggu aja hehehe).dan akhirnya juga saya bisa menemukan judulnya apa yang pass buat tips kali ini,setelah semalam sudah saya share juga tips Update/Upgrade Windows XP SP1 dan 2 ke SP3.Mungkin bagi yang XPnya original nan genuine langsung upgrade ke sp3 hehehe,tapi bagi yang gak asli,genuine tapi ada tambahan victimnya,maupun Blocked VLK,mengurungkan niatnya untuk upgrade.Oke lah kalo begitu akan saya coba share bagaimana caranya Menjadikan atau membuat atau merubah windows SP3 atau sp2 maupun sp1 yang bajakan menjadi genuine dan kayak Asli atau Original hehehe.Dengan Trik ini selain bisa menjadikan win xp anda jadi asli,selain itu juga menghilangkan Windows Victim bagi yang sudah terkena victim,karena gak tahu windowsnya melakukan Update Otomatis,sehingga waktu komputer diaktifkan keluar tulisan You Maybe a Victim of Software Counterfeiting,menyebalkan mungkin yahh kalau muncul peringatan WGA seperti itu hehehe.
Registry Editing Has Been Disabled By Your Administrator
Today a friend of mine asked that his registry editor had been disabled accidentally and now how should he enable it back again. Here are three ways to enable the registry editing in Windows.If Windows Registry Editor has been disabled, it shows the following error message:

In the left hand menu, go to User Config –> Administrative Templated –> System.
Now In the right hand pane, select “Prevent access to registry editing tools”. It will probably be not configured or enabled. If it’s enabled, disable it and if it’s not configured, first enable it, apply settings and then disable it. Most probably the settings have been applied instantly. If not, then run gpupdate in command prompt to apply the group policies.
“Registry Editing Has Been Disabled By Your Administrator”

1- From Group Policy Editor
Go to Run –> gpedit.mscIn the left hand menu, go to User Config –> Administrative Templated –> System.
Now In the right hand pane, select “Prevent access to registry editing tools”. It will probably be not configured or enabled. If it’s enabled, disable it and if it’s not configured, first enable it, apply settings and then disable it. Most probably the settings have been applied instantly. If not, then run gpupdate in command prompt to apply the group policies.
Cara Aktivasi Windows XP
Membaca beberapa comment rekan-rekan mengenai Cara Aktivasi Windows
XP, maka kali ini om HOBIGRATIS tulis beberapa hal yang perlu dilakukan
untuk mengaktifasi Windows XP yang kita gunakan.
Namun sebelum sampai ke langkah-langkah aktifasi, perlu dipersiapkan beberapa hal, antara lain:
1. Windows sudah terinstall dikomputer/laptop (ya jelas dong yah… he.. he… )
2. Serial Number Windows XP
Bagi temen-temen yang membeli Windows Ori pastinya sudah memasukkan Serial Number yang disertakan di COA (Certificate of Authenticify) bersama CD. Namun bagi yang CD windowsnya pinjem sama temen perlu nyari deh (bisa ke teman/kolega/saudara/tanya sama om Google….
3. Koneksi Internet
untuk melakukan Aktifasi yang legal, kompi kita musti terkoneksi ke Internet. Sedang yang kurang legal, cuman butuh trik.
Setelah kita menyiapkan beberapa hal tadi, untuk melakukan aktifasi kita lakukan langkah-langkah berikut :
1. Bagi yang Windowsnya Original, koneksikan kompi/laptop ke Internet, kemudian aktifasikan secara Online. Temen-temen tinggal Klik Aktifasi Windows, lalu tunggu dan ikuti semua langkah yang diminta oleh Microsoft. lamanya proses tergantung kecepatan dan kelancaran koneksi internet. Selesaai…
Melihat Serial Number Windows Kita
 Serial Number adalah serangkaian angka dan huruf yang sangat berguna sebagai ‘nyawa’ dari sebuah aplikasi berbayar. Tanpa serial number, aplikasi yang telah kita instal tidak akan bisa terus jalan. Tapi seringkali sebagai pengguna sering melupakan serial number yang kita punyai. Biasanya sih S/N tertulis di box atau casing CD dari software atau aplikasi yang kita beli. Tetapi untungnya, ada aplikasi khusus untuk melihat S/N dari aplikasi-aplikasi yang terintal di komputer kita, termasuk Windows dan Microsoft Office kita. Aplikasi ini bernama KeyFinder, yang sampai artikel ini ditulis sudah di versi 2.0.1.
Untuk menggunakan aplikasi ini, berikut langkah-langkahnya:
Aktivasi Windows XP Pro SP3 Genuine
Para pecinta Windows XP kini bisa berbangga hati, sebab Microsoft telah meluncurkan Windows XP SP3 Final yang dikemas dalam satu CD yang bisa diinstalasikan lewat DOS. Sebelumnya memang Microsoft telah menyediakan Update Service Pack 3 untuk mengupgarde Windows XP SP2. Namun menurut banyak kalangan, integrasi ini masih kurang stabil dan sering menemui kendala pada system.
Langganan:
Komentar (Atom)


