Blog Archive

Perempuan apabila sembahyang lima waktu, puasa bulan Ramadhan, memelihara kehormatannya serta taat akan suaminya, masuklah dia dari pintu syurga mana sahaja yang dikehendaki.(Women are five times when prayer, fasting month of Ramadan, will maintain his honor and obey her husband, she entered the door of heaven where the desired sake only.)
Tampilkan postingan dengan label Blog Tutorial. Tampilkan semua postingan

Senin, 13 Desember 2010

How do I add Reactions to my blog?

google-site-verification=ConJMH783GAFpknpANwlOsajeF2uHunuHjbBhFZBAcw
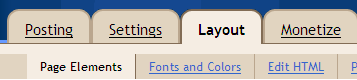
Adding Reactions is done through the settings page of the Blog Post widget. From the Layout | Page Elements tab, simply click the 'Edit' link under the Blog Post widget and a settings window will pop up.

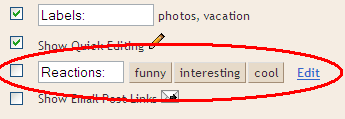
The Configure Blog Post window will display a handful of options, and the Reactions feature is near the bottom of the list:

To turn on Reactions just select the checkbox, and then you will be able to customize the feature by adding words of your choosing. Finally, you can choose the exact location of Reactions by dragging the widget at the bottom of the Configure Blog Post page:

Jumat, 10 Desember 2010

How to Publish at Article Writing Sites - Page 2

google-site-verification=ConJMH783GAFpknpANwlOsajeF2uHunuHjbBhFZBAcw
Often, they are looking for factual, more journalistic prose. For some, third person points of view come naturally; others must practice it. All good writing handbooks have sections discussing these different modes, and it is well worth your time to study and master them. Versatility will be your reward, and versatile freelancers get more opportunities to win bids.

Keywords
At this point, the web probably contains hundreds of millions of articles. Part of your job as a web writer is to make your article does not get lost in the haystack. It must be the needle that gets found. The best way to make it easy for someone to discover your great article is by working suitable keywords into your content, so that someone who searches for, say, “best orange racing bike” will find your review article, rather than go read a different article about “taking oranges on bike races to maintain hydration.” Submissions to Write sites
Conduct research on the term “keyword density.” Learn the ins and out of its strategy. Most article publication sites recommend- and some absolutely insist- that your article feature a stated keyword density. Numerous free tools are available to help ensure that your content meets the keyword density requirements of a given publisher or employer.
Hyperlinks, URL’s and Anchor Text

Today’s writer must learn how to embed hyperlinks into his text, and how to control the action a browser must take when following a hyperlink in the text. Do you want the link to open in a new window? The same window? Does it need to open a video player? Double-check all embedded links to make sure that they are “live.” “Dead” or broken links are those that do not lead where they are supposed to, and not only frustrate to your readers, but get your article flagged by an editor, who will insist on revision.
Short Paragraphs

How to Publish at Article Writing Sites

google-site-verification=ConJMH783GAFpknpANwlOsajeF2uHunuHjbBhFZBAcw
We are free to publish what we please on our own blogs, but most article submission sites demand that certain criteria be met before they will accept an article, or allow it to remain unedited once it has been published. Sites encouraging article submission range in the stringency of their criteria: some are quite lax, others rather demanding.
By definition, you are most often in the company of superior writers at sites whose editors or submission guidelines insist that you adhere to rules ensuring that your prose is at least fundamentally sound. Employers quickly learn which sites insist on higher quality writing. When your portfolio includes pieces published at the sites with better reputations for showcasing quality writers, you stand of better chance of winning your bid for work. In effect, publication at a site whose guidelines are strict, is perfect screening for the quality that will interest an employer.
Therefore, aspiring writers must become familiar with the criteria set by a range of article submission sites and, if possible, map out a plan to produce work that first satisfies the most lenient outlets, and progress towards the sites that demand higher quality. Doing so will help you avoid frustration. You will build confidence in your abilities as your pieces are accepted on increasingly better, higher-profile sites.
If you follow this path, your developing skills will lead you to prominence in the writing community but, first, you must submit to not only the sites, but the rules upon which they insist. Common Expectations at Article Submission Sites
To ensure that your finished piece is ready for submission to an editor, employer or an article submission site, it must meet the common minimum expectations for contemporary web writing, such as:
Point of View

As a blogger, you have no doubt deployed first person point of view. As soon as you use the phrase “I think,” or “I saw,” you are in first person mode.
However, many, if not most, article submission sites insist that your writing is at least in second person (“You can”), and many good sites insist one third person (“One can”). To distinguish themselves from blogs, many sites prefer that a writer adopt the more objective third person stance. Such sites are not looking for

the weblog handbook

the weblog handbook cover

When Perseus Publishing asked me to write a book on weblogs, I laughed. A book about weblogs? Everything you need to know is on the web!
But the more I thought about it, the more I realized how much I've learned since I started my site in 1999 — some of which is so obvious to experienced online denizens it doesn't seem worth explaining, but that as a newcomer I wouldn't have known to ask. Thus the weblog handbook was born.
I arranged the book in roughly the order I expect most people approach the subject, first explaining what weblogs are and why anyone would want to read or maintain one, and then moving through more practical considerations: how to choose a tool to update your site, how to make your weblog stand out, and how to attract an audience. I answer commonly asked questions about weblog etiquette, explain what you need to know about living online, and give you some suggestions for dealing with burn-out. In short, I've done my best to get everything I know about maintaining a weblog — any kind of weblog — onto the page so that you can benefit from my experience.
“ This book almost rivals Strunk and White's Elements of Style in eloquence and utility. ” — Herkimer- Perkins
I also tried to place weblogs into a larger cultural and media context. In doing so, I explore the weblog's relationship to journalism, discuss the cultural context from which weblogs emerged, and examine the ways in which the community defined itself. I start the book with an explanation of the form and end with an examination of the emergence of the early weblog community in relation to pre-existing online culture, the ways in which old-media paradigms have informed perceptions and practitioners of the form, and the state of the Weblog Nation in 2002.

advance praise:

Douglas Rushkoff — “The weblog represents the Internet at its best: thousands of authors on a single network, sharing their experiences of the world we all live in. This passionate guide to the joy of weblogging got me off my duff and writing my own. May it do the same for you.”
Jon Katz — “The weblog has enormous consequences for media, marketing, community, and what we used to call journalism. In her readable and useful handbook, Rebecca Blood has written one of the first—and by far the best—explanations of why we should care about this vibrant, organic and fiercely individualistic community. Whether you want to start one, join one, or understand the many profound implications of the blog, this book is the best place to start.”
David Weinberger — “From one of the original webloggers comes not just a How-To but also a What-to, Why-to and a So-what that focuses not on the mechanics but on helping you become a valued member of this important new global community.”
google-site-verification=ConJMH783GAFpknpANwlOsajeF2uHunuHjbBhFZBAcw
weblogs: a history and perspective

In 1998 there were just a handful of sites of the type that are now identified as weblogs (so named by Jorn Barger in December 1997). Jesse James Garrett, editor of Infosift, began compiling a list of "other sites like his" as he found them in his travels around the web. In November of that year, he sent that list to Cameron Barrett. Cameron published the list on Camworld, and others maintaining similar sites began sending their URLs to him for inclusion on the list. Jesse's 'page of only weblogs' lists the 23 known to be in existence at the beginning of 1999.

Blog Basics

What is a blog?
A blog is a Web publishing tool that allows authors to quickly and easily self-publish text, artwork, links to other blogs or Web sites, and a whole array of other content.

Blogs are set-up like conventional Web sites, with navigation links, and other standard Web site features. A blog is different from a typical Web site in that the primary content is comprised of a daily
posting. Blog postings are text entries, similar to a diary or journal, which include a posting date. They include subsequent comments made by people other than the author. Postings are often short and frequently updated. They appear in reverse chronological order and can include archived entries.
Blogs work well for students because they can be worked on at virtually any time, in any place with an Internet-enabled computer. Hence, they can be used by teachers to create a classroom that extends beyond the boundaries of the school yard.

User-Friendly Technology
Blogs are surprisingly easy to use. They require minimum technical knowledge and are quickly and easily created and maintained. Unlike many traditional Web sites, they are flexible in design and can be changed relatively easily. Best of all, students will find them convenient and accessible via home or library computers.

Educational Benefits of Blogs
In addition to providing teachers with an excellent tool for communicating with students, there are numerous educational benefits of blogs. Blogs are
  • motivating to students, especially those who otherwise might not become participants in classrooms
  • excellent opportunities for students to read and write.
  • effective forums for collaboration and discussion.
  • powerful tools to enable scaffolded learning or mentoring to occur.
Using the Blog in the Classroom
As an educational tool, blogs may be integrated in a multi-faceted manner to accommodate all learners. Blogs can serve at least four basic functions.
  1. Classroom Management
    Class blogs can serve as a portal to foster a community of learners. As they are easy to create and update efficiently, they can be used to inform students of class requirements, post handouts, notices, and homework assignments, or act as a question and answer board.
     
  1. Collaboration
    Blogs provide a space where teachers and students can work to further develop writing or other skills with the advantage of an instant audience. Teachers can offer instructional tips, and students can practice and benefit from peer review. They also make online mentoring possible. For example, a class of older students can help a class of younger students develop more confidence in their writing skills. Students can also participate in cooperative learning activities that require them to relay research findings, ideas, or suggestions.
  1. Discussions
    A class blog opens the opportunity for students to discuss topics outside of the classroom. With a blog, every person has an equal opportunity to share their thoughts and opinions. Students have time to react to ideas and reflect on learning. Teachers can also bring together a group of knowledgeable individuals for a given unit of study for students to network and conference with on a blog.
  1. Student Portfolios
    Blogs present, organize, and protect student work as digital portfolios. As older entries are archived, developing skills and progress may be analyzed more conveniently. Additionally, as students realize their efforts will be published, they are typically more motivated to produce better writing. Teachers and peers may conference with a student individually on a developing work, and expert or peer mentoring advice can be easily kept for future reference.
Blog Risks to Consider
School districts have guidelines and acceptable use policies (AUP) regarding the use of school and division-wide computer networks and the Internet. These terms and conditions identify acceptable online behavior and access privileges. Policies regarding the displaying of any student work must be adhered to strictly. Take the necessary steps to secure parental permission before using the blog in a participatory manner.

Blogs may be viewed publicly, as any other Web site. Students must be trained on issues regarding access, privacy, security, and free expression. As blogs have no publisher, producer, or editor, students must carefully consider the content of postings to avoid anything defamatory, libelous, or infringing upon the rights of others.

Blogs are created by individuals for various and assorted purposes. Content should be recognized as the opinion of the blogger, and, therefore, may not necessarily be factual.

Senin, 06 Desember 2010

Membuat Daftar Isi Postingan Blog

Ada beberapa cara untuk membuat daftar isi blog ini, dan saungweb akan coba berbagi info tentang cara mudah Membuat Daftar Isi Postingan Blog yang pernah dilakukan setelah mencari beberapa referensi dari blognya sobat Marcellino dll. Nah hasil dari semua itu setelah dipraktekan bisa dilihat di Daftar Isi blog ini.

Kita bisa menampilkan semua postingan maupun hanya beberapa saja. Ok.... langsung aja meluncur.. tanpa bla..bla..bla..toh keuntungan memasang daftar isi.. pasti dah tahu semua.. ya kan ???.
Bagi yang berminat langkahnya .. seperti ini :

Membuat Daftar Isi Sesuai Label

Ada beberapa macam cara untuk membuat daftar isi atau Table Of Content (TOC) yaitu ada yang disimpan di sidebar atau dipostingan, ada yang berdasarkan label atau  tanggal posting dll.. Dan sekarang saya akan posting tentang Cara Membuat Daftar Isi Sesuai Label atau Category.
Membuat daftar isi di blog tentu sangat dibutuhkan untuk memudahkan pengunjung mencari artikel/materi yang dibutuhkan, tentu ini sebagai salah satu bentuk pelayanan prima bagi pengunjung, apalagi jika artikelnya sudah banyak.
Nah kali ini saya akan posting sekalian menjawab sobat yang bertanya tentang bagaimana Cara  Membuat Daftar Isi Berdasarkan Label atau Kategori yang disimpan pada halaman posting seperti contoh Daftar Isi pada blog ini.
Cara membuat Daftar Isi ini saya dapatkan dari blognya Abu Farhan dan sudah saya edit sendiri,  langkah-langkahnya seperti ini :

  1. Login dulu  ke    http://www.blogger.com/ 
  2. Kemudian buat sebuah Entri Baru dan pilih Edit HTML. atau kalau biasa pake Windows Live Writer (WLW) gunakan modus Source atau Sumber.
  3. Berilah judul, misalnya: Daftar Isi Berdasarkan Label.
  4. Copy Paste script dibawah ini dan ganti nama hazirah-muslimah.blogspot.com dengan nama Blog anda :
    <script style="text/javascript" src="http://saungweb.googlecode.com/files/TOCcategory.js"> </script>
    <script src="http://hazirah-muslimah.blogspot.com/feeds/posts/default?max-results=9999&alt=json-in-script&callback=loadtoc"></script>
  5. Setelah di-paste, klik Terbitkan Entri atau publish dan lihat hasilnya
  6. Kalau artikelnya sudah banyak bisa ditambah fungsi scrol yang di pasang sebelum code no. 4 , sehingga lengkapnya akan seperti ini : (Kode warna pink silahkan sesuaikan, kalaupun mau dihapus juga silahkan) :
    <div style="overflow:auto; border: 1px solid #CCC; margin: auto; padding: 3px; width: 95%; height: 400px; background-color: none; text-align: left;">
    <p align="center">
    <font size="4">Daftar Isi Blog Berdasarkan Label / Category</font></p>

    <script style="text/javascript" src="http://saungweb.googlecode.com/files/TOCcategory.js"></script>
    <script src="http://saungweb.blogspot.com/feeds/posts/default?max-results=9999&alt=json-in-script&callback=loadtoc"></script>
    <p>
    Untuk melihat <a href="
    http://saungweb.blogspot.com/2010/04/daftar-isi-berdasarkan-tanggal-posting.html" target="_blank">Daftar Isi Berdasarkan Tanggal Posting</a> silahkan di klik aja sob.</p>
    </div>
  7. Langkah selanjutnya tinggal buat link yg menuju ke postingan ini  dan  bisa disimpan di navbar menu atau di sidebar dll, contoh :
<a href='http://hazirah-muslimah.blogspot.com/2010/12/daftar-isi.html' target='_blank'>Daftar Isi Berdasarkan Label </a>
dan :
<a href='http://hazirah-muslimah.blogspot.com/2010/12/daftar-isi-berdasarkan-tanggal-posting.html' target='_blank'>Daftar Isi Berdasarkan Tanggal Posting</a>
Oh ya dulu pernah juga posting Cara Membuat daftar isi yang disimpan disidebar namun gak dipakai lagi. karena sekarang pakai Daftar Isi Sesuai Label dan Tanggal Posting.
Selamat mencoba semoga berhasil ohya.. jangan kaget kalau saat loading pertama daftar isinya agak lama ya.. dan untuk daftar isi berdasarkan tanggal posting tunggu postingan selanjutnya yaaaa…..

Cara Daftar Dan Upload Gambar Di Photobucket

Cara Daftar Dan Upload Gambar Di Photobucket , gak sengaja buka2 arsip ternyata judul ini belum terpublish padahal harusnya Oktober 2009 lho. dasar pelupa. Untuk upload gambar atau photo ini sebelumnya kita harus punya account disana, untuk punya account ya.. tentu harus registrasi atawa daftar dulu.  Ohya kalau ada yang belum tahu bahwa Photobukcet adalah tempat menyimpan file berupa photo, gambar, banner deesbe secara online, file2 yang disimpan ini tak akan hilang sampai kapanpun kecuali dihapus oleh siempunya account itu sendiri, jadi sama dengan arsip atau album online lah kalau nanti2 kita mau lihat lagi atau mungkin anak cucu mau lihat dimanapun berada ya tinggal dibuka aja.. Ok langsung meluncur ke tkp , kira2 gini :
A. Cara Daftar Di Photobucket

  1. Masuk ke situs photobucket.com disini  lalu  Klik tombol warna hijau yang bertulisakan [Join Now].
  2. Isikan data2 yang diminta seperti User Name , Password , re-type password , lalu KLIK [NEXT STEP]
  3. Ikuti perintah selanjutnya kalo sudah diisi semua klik [I accept Sign me Up!]
  4. Selesailah kita untuk mendaftar
B. Cara Upload Gambar Di Photobucket
  1. Pilih Sumber gambar atau photo yang mau di upload kemudian beri tanda pada pilihan yang tersedia , misalnya kalau gambarnya disimpan pada komputer, beri centang pada "my computer" lalu klik Choose Files.
  2. Kalau [Chosse File] tidak bisa di klik maka perhatikan Use our faster bulk uploader ? or old uploader di bawah tulisan [Chosse File] terus pilih or old uploader
  3. Klik Upload Images & Videos Cari atau browse gambar yang mau diupload (format gambar yang diterima adalah .gif, .jpg dan .bmp), lalu klik Open
  4. Tunggu beberapa saat hingga proses upload selesai. Klik Save and continue
  5. Masukan juga judul, deskripsi dan tag dari gambar yang kita upload tadi , lalu  klik Save  & Return to Album atau save & Get Links
  6. Selesai. Sekarang gambar Anda sudah tersimpan di photobucket , tinggal klik gambarnya untuk mengambil code yang diberikan , seperti dibawah ini :
clip_image003
Keterangan: Untuk menampilkan gambar pada photobucket via email gunakan email & IM
Untuk memasang favicon gunakan direct link sebagai alamat URLnya.
Untuk memasang gambar pada artikel gunakan HTML code
Untuk memasang gambar pada forum gunakan IMG code
Nah begitulah tentang Cara Daftar Dan Upload Gambar Di Photobucket ini, bagi yang berminat silahkan dicoba n dicicipi mumpung gratis..

Membuat Scroll Pada Archive Blog

Masih dalam rangkaian utak-atik template untuk tampilan blog, kali ini akan berbagi cara Membuat Scroll Pada Archive Blog seperti pada blog ini jika jumlah artikelnya pada bulan itu banyak maka scrollnya akan berfungsi.  Ini juga sekaligus sebagai realisasi dari janji saya pada postingan sebelumnya.
Cara Membuat Scroll Pada Archive Blog ini hampir sama dengan membuat Fungsi Scroll Pada Label / Kategori yang telah saya posting sebelumnya, perbedaannya hanya terletak pada kata label dengan archive saja.
Untuk  jelasnya langsung saja langkahnya seperti ini :

  1. Masuk dulu ke Acount Blogger atau Dashboard
  2. Pilih Layout , lalu klik Edit HTML
  3. Centang dulu  Expand Widget Templates
  4. Cari kode yang seperti ini : <div id='ArchiveList'>  atau kata Archive.
  5. Untuk memudahkan mencarinya , pakai saja Ctrl +F , terus ketik kata yang dicari dikotak yang disediakan, lalu klik next. 
  6. Kalau sudah,  tambahkan kode warna merah itu sebagai scollnya
  7. Lengkapnya kode tersebut seperti dibawah ini :
    <h2><data:title/></h2>
      </b:if>
      <div class='widget-content'>
    <div style='overflow:auto; width:ancho; height:200px;'>
      <div id='ArchiveList'>
      <div expr:id='data:widget.instanceId + &quot;_ArchiveList&quot;'>
        <b:if cond='data:style == &quot;HIERARCHY&quot;'>
         <b:include data='data' name='interval'/>
        </b:if>
        <b:if cond='data:style == &quot;FLAT&quot;'>
          <b:include data='data' name='flat'/>
        </b:if>
        <b:if cond='data:style == &quot;MENU&quot;'>
          <b:include data='data' name='menu'/>
        </b:if>
      </div></div>
      </div>
      <b:include name='quickedit'/>
      </div>
    </b:includable>
  8. Angka 200px adalah tinggi kotak scroll itu, silahkan disesuaikan.
  9. Mungkin saja diblog sobat kodenya beda,,  Oleh karena itu carilah yang mirip dan perlu dicoba, terus jangan lupa templatenya dibackup dulu.
  10. Kalau sudah jangan lupa save template .
  11. Selesai.
Hasil akhirnya adalah seperti ini :
clip_image002
Masih sekitar tema scrolling, sebelumnya saya juga telah posting membuat Fungsi Scroll Pada Komentar dan Fungsi Scroll pada Related Post serta Fungsi Scroll Pada Label / Kategori. Kalau diperlukan silahkan aja di klik.
Cuma bocoran saja (biar tidak lupa), ada beberapa kegiatan ngeblog lagi yang telah saya lakukan minggu ini, naah kegiatan tsb. Insya Allah akan saya dokumentasikan pada posting selanjutnya, yaitu tentang :

  1. Cara merubah lebar kolom pada sidebar ..  coba perhatikan lebarnya saya tambah 100 pixel tuh.
  2. Cara menghosting CSS Blog ke pihak ketiga..
  3. Cara membuat menu tab view .  , dll.
Makanya agar tidak ketinggalan info, masukan Email sobat untuk berlangganan artikel Saung Web secara gratis.. ., Selamat  mencoba semoga bermanfaat.
Update :
  1. Silahkan lihat Cara Merubah Lebar Kolom Pada Template
  2. Cara hosting file di google Site lihat disini
  3. Loading Blog lebih Cepat Dengan CSS External

Kamis, 02 Desember 2010

An overview of the new post editor

How to enable the new editor


To enable the new editor, first navigate to your blog's Settings | Basic tab. Near the bottom of the page you will see a field called Select Post Editor, and from there you simply need to select Updated Editor and save your settings. That's it! Now on to the new features...

Improved Image Handling

When you upload an image to the new post editor it will appear as a thumbnail in the image dialog box. That way, you can upload several images at once, and then add them into your post at your convenience. The thumbnails will be available until you close the post editor.
When you add an image from the dialog into your post it will be placed at the insertion point instead of at the top of the post.
If you don’t like where an image is in your post, you can drag it around to another spot. If you drag it towards the left side of the editor it will float to the left, likewise for the right, and if you leave it in the center it will be centered. You can drag the image between paragraphs and other block elements. Unlike in the current editor, dragging in the new editor preserves the link to the full-size version of the image.
You can easily resize or remove an image with the image size “bubble.” Click on the image (Firefox 3 users may need to double-click) to bring up the bubble, and resize the image instantly. You can resize any image, including ones added by URL, but if you resize an image that was uploaded through the post editor we resample the image on our servers to keep the download size small.


Fonts and Colors Tags for Layouts

If you know HTML or CSS, you're welcome to modify the fonts and colors in your template any way you like. However, if you want them to work with the Fonts and Colors feature of Blogger Layouts, then there are a few guidelines to follow. Doing it this way will let you modify the colors more easily if you change your mind later. It also helps if you share your template with someone else who wants to customize their version a bit.
In the <head> section of your code, you'll need to have a pair of <b:skin> </b:skin> tags. The CSS style declarations will go in between those tags, along with the variable names that make your design work with the Fonts and Colors page. Here's a brief example of how it looks, before we get into the details:

<head>

Page Elements Tags for Layouts

The <body> section of a Layouts template is made up primarily of sections and widgets. Sections mark out areas of your page, such as the sidebar, footer, etc. A widget is an individual page element such as a picture, a blogroll, or anything else you can add from the Page Elements tab. You can include any HTML you like around the sections in your template.
Each section in your template has an opening and a closing tag, looking something like this:
<b:section id='header' class='header' maxwidgets="1" showaddelement="no">
</b:section>

A <b:section> tag can have the following attributes:

Widget Tags for Layouts

The basic <b:widget> tags for creating widgets are described in Page Element Tags for Layouts. If you just want to use the Page Elements tab to work with everything, then that's all you need to know. However, if you want more fine-grained control, this article describes what you can put inside a widget, if you're working in the "Expand Widget Templates" mode of the Edit HTML page.
The first thing to do is to add a closing tag. So this:
<b:widget [...attributes...] />

becomes this:
<b:widget [...attributes...]>
</b:widget>

Now with that out of the way, let's talk about what you can put between those tags.

What Are Pages

Blogger pages let you to publish static information on stand-alone pages linked from your blog. For example, you can use pages to create an About This Blog page that discusses the evolution of your blog, or a Contact Me page that provides directions, a phone number, and a map to your location.
You create a page similar to how you write a blog post. From Blogger in Draft click Posting | Edit Pages tab, then click New Page. (Note: you can create up to 10 pages)

Blogging from iGoogle and Gmail

The Blogger Posting gadget makes it easy to post to your blog from the convenience of Gmail or your iGoogle homepage.

To add the Blogger Posting Gadget to your iGoogle page, simply click this button:
Add to Google
Then click the blue "Add to Google" button. Make sure that you're signed in with the same Google account that you use for Blogger. Once you've added the Blogger Posting Gadget you will see the gadget on your iGoogle page:
To add the Blogger Posting Gadget in Gmail, you'll first have to enable the Add Gadget by URL lab feature from your settings:

Cara Memindahkan Domain Blog Ke Akun Gmail Lain


Dalam beberapa kasus kita mungkin ingin memindahkan domain blog kita ke akun gmail lain yang kita punya. Mungkin kita ingin mendaftarkan Google Adsense,  karena akun gmail lama tidak ada aplikasi bahasa Indonesia.

Atau mungkin kita ingin memindahkan ke akun gmail baru yang kita punya. Dan lain sebagainya. Kalau saya akun gmail blogger.com saya sudah terlalu banyak dan saya ingin mendaftarkan blog saya di Google Adsense. Soalnya akun gmail lama tidak ada pendukung bahasa Indonesia.

Lalu gimana ya caranya memindahkan domain blog kita ke akun gmail lain ? Berikut caranya
Caranya ternyata mudah juga anda tidak perlu mengerti FTP Hosting atau apalah yang bikin pusing kepala.

How do I add Reactions to my blog?

http://www.google.com/support/blogger/bin/answer.py?hl=en&answer=143413&ctx=share


RECENT POST MODEL SCROLL DI BLOG


Untuk sistem Scroll Recent Post disini adalah dengan menggunakan sistem marquee dari Judul Post.


Caranya cukup sederhana tinggal copy paste kode dibawah ini ke kotak Add Widget HTML/Scrip di blog, dan lakukan beberapa perubahan untuk penyesuaiannya.


Cara Membuat Label Dengan Fungsi Scroll

Tutorial memasang label dengan fungsi scroll ini sengaja saya tulis semata-mata untuk membantu blogger yang mempunyai banyak label / kategori dalam blognya. Jika di pasang semua tentunya akan makan tempat, dan mungkin bisa membuat blog jadi timpang alias panjang sebelah antara postingan dengan sidebar.

Menu scroll tentunya sudah banyak yang tau, menu ini dapat ditarik ke bawah dan ke atas. Cara membuatnya sangat mudah, hanya dengan menyisipkan sedikit kode HTML maka jadilah label dengan fungsi scroll.

Label

Search Islamic Directory
Keyword: